
BigCommerce QuickBooks Integration: How to Set it Up

Integrating BigCommerce and QuickBooks Online is a great way to save time on bookkeeping and get accurate numbers for your BigCommerce store.
Whether you’re a BigCommerce seller, or an accountant or bookkeeper who works with BigCommerce sellers, you’ll understand some of the complexities that come along with selling on BigCommerce – such as managing different transaction types, reconciling payment gateways, and ensuring you’re reporting on tax correctly.
Fortunately, integrating BigCommerce and QuickBooks with the right tool can help simplify and speed up your BigCommerce bookkeeping process.
Read on to better understand how to integrate BigCommerce with QuickBooks Online.
Key takeaways
- Integrating BigCommerce and QuickBooks Online is possible using an app or tool.
- Due to BigCommerce’s use of payment gateways, it is important to keep easy and accurate reconciliation in mind when choosing an integration app or tool.
- Integrating BigCommerce and QuickBooks Online using A2X is easy – follow the setup steps below to get started.
Table of Contents
Integrate BigCommerce and QuickBooks Online for accurate accounting
A2X auto-categorizes your BigCommerce sales, taxes, refunds, and more into accurate summaries that make reconciliation in QuickBooks Online a breeze.
Try A2X today
Can BigCommerce integrate with QuickBooks Online?
Yes, BigCommerce can integrate with QuickBooks Online via an app or a tool.
Integrating BigCommerce with QuickBooks Online means connecting these two tools so that your BigCommerce transaction data – including sales, fees, refunds, and more – can flow seamlessly into QuickBooks so that you can accurately reconcile your BigCommerce payouts.
How to integrate BigCommerce with QuickBooks Online
As mentioned above, you need an additional third-party app (such as A2X) to connect BigCommerce with QuickBooks Online.
There are a few different types of apps and tools available, and you can find various options on the QuickBooks App Store (for example, QuickBooks has a data syncing app available called OneSaaS that can connect BigCommerce and QuickBooks Online).
The app or tool that you choose to integrate BigCommerce and QBO will ultimately depend on your unique business needs.
What to look for when choosing an integration tool
Ultimately, if your goal with connecting BigCommerce with QuickBooks is to achieve easier, faster, and more accurate books (and ultimately, investor-ready financials), then it’s important to look for an integration tool that’s designed for this specific purpose.
When evaluating integration tools, keep the following in mind to ensure easy and accurate reconciliation.
Capture all tax, currency, and transaction types
There are some free “data syncing” apps available on the QuickBooks App Store that can be used to get some BigCommerce data into QBO.
While these apps might be tempting to try because of their low monetary cost, you might run into some challenges, such as:
- Too much data clogging your accounting system
- Missing tax or transaction types
- Inability to capture different currencies (when selling in multiple regions)
Missing data and sorting through too much data can defeat the purpose of using a tool to make BigCommerce bookkeeping easier, so make sure you choose a tool that can capture all BigCommerce transaction types.
Payment gateway support
A major difference between BigCommerce and other ecommerce platforms is that BigCommerce manages payments exclusively through payment gateways.
This simply means that all BigCommerce sellers receive all payments via their choice payment gateway providers, such as Affirm, Afterpay, Square, Stripe, and more.
While this provides a great experience for buyers, it does cause a few extra steps in the bookkeeping process – which makes it an important consideration when choosing an integration tool.
Payment gateways will deduct their fees when they process payments. Therefore, the money you receive in your bank account won’t directly tie back to your BigCommerce store.
However, best practice apps, such as A2X, will provide a way to account for your BigCommerce store and capture payment gateway transactions.
How A2X makes BigCommerce bookkeeping easy
A2X is an ecommerce integration tool designed to connect BigCommerce with QuickBooks Online to make bookkeeping quick, easy, and accurate.
At a high-level, here’s how A2X works:
- Connect A2X to QuickBooks Online and BigCommerce.
- Use A2X to “map” (i.e., categorize) all BigCommerce transaction types to your Chart of Accounts in QuickBooks.
- A2X will then fetch all BigCommerce payouts and code them according to your specifications on a going-forward basis. A2X will post a daily entry that includes a line for each payment gateway.
- A2X will create a clearing account in QuickBooks. Payout details will be posted to the clearing account, ready for reconciliation. All you need to do is input the payment gateway fees.
- A2X will also attach a summary CSV file that includes individual order details, which serves as an audit trail and as a way to see order details included in a particular payment.
BigCommerce bookkeeping is complicated, but A2X can make it particularly easy by:
- Capturing data from all payment gateways included on a BigCommerce site
- Capturing all currencies and transaction types
- Capturing necessary tax details

How to integrate BigCommerce with QBO using A2X
Follow the steps below for a detailed guide on how to integrate BigCommerce and QBO using A2X, and reconcile your accounts in just a few steps.
1. Sign up for a free trial of A2X
All A2X accounts begin with a free trial so you can test it out and decide if it’s a good fit for your business needs. No credit card is required to sign up.
Sign up for a free trial of A2X by clicking the ‘Try A2X for free’ button in the top right corner.
When asked which sales channel you’d like to connect to first, click BigCommerce.
Then, select your preferred sign in method, and follow the prompts to finish setting up your trial account.
You will land on the A2X dashboard.
2. Connect to QuickBooks Online
On the A2X dashboard, you’ll see a prompt to connect to your accounting software.

Click the QuickBooks logo, then click ‘Connect’.
You’ll be redirected to enter your QuickBooks Online login info and/or to enable permissions for A2X to send data to your QuickBooks account.
When you’re done, you’ll land back on the A2X dashboard.
3. Connect to BigCommerce
Next, you’ll see a prompt to connect to BigCommerce.
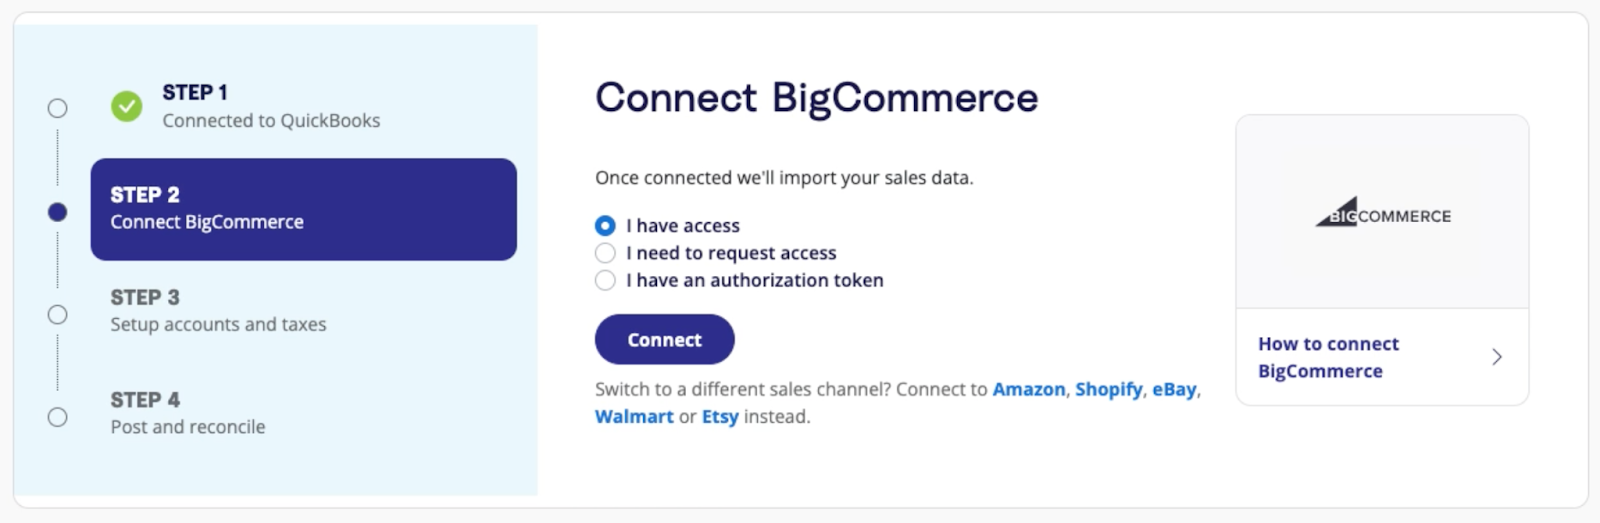
You have 3 options to connect:
- If you have access to the store you wish to connect to, select ‘I have access’, then enter the store hash on the following screen.
- If you need to request access (e.g., you are an accountant or bookkeeper working with a BigCommerce seller), then you can select this option, which will allow you to send an email notification to the BigCommerce seller so they can provide A2X with access.
- If you have an authorization token, you can also connect using this information.
Once A2X is connected to QBO and BigCommerce, the integration is officially established and A2X will begin fetching payout data from BigCommerce.
Don’t worry – A2X won’t post anything to QBO until you’re ready.
4. Map accounts and taxes
We strongly recommend working with an accountant or bookkeeper who specializes in ecommerce to complete this step.
This is where you will choose how to categorize, or “map”, how A2X will code BigCommerce transactions to the Chart of Accounts in QuickBooks.
Once you set this up, A2X will apply your mapping directions to all new payouts going forward. While it might take a bit of time to initially set up, it can help you save tons of time in the future.
When you first land on the accounts and taxes page, you’ll be asked a series of questions. Then, you’ll be presented with two options: Assisted setup or Custom setup:
- Assisted setup (recommended): A2X will apply general best practice accounts and tax rate mappings to BigCommerce transactions (based on your answers in the questionnaire). You can add or change mapping details as necessary, at any time. A2X will create default accounts in QBO for you. The default accounts that A2X will create include:
- BigCommerce Carried Balances
- BigCommerce Sales
- BigCommerce Refunds
- BigCommerce Shipping
- BigCommerce Discounts
- BigCommerce Sales Tax Collected
- BigCommerce Pending Balances
- BigCommerce Clearing Account – Note: By default, A2X only creates one payment gateway clearing account and posts all payment gateways to that account. A good idea might be to set up separate clearing accounts for each payment gateway (e.g., one for PayPal, one for Afterpay, etc.).
- Custom setup: With this option, you will manually apply accounts and tax rates to each BigCommerce transaction type. This might be a good option if you have a unique business setup. Speak to an ecommerce accounting expert to better understand if this option is required for you.
Watch this video to better understand how the Accounts and Tax Mapping page works in A2X.
When you’ve completed your accounts and tax mapping, click ‘Save mappings’.
5. Review and post
With accounts and tax mapping complete, you’re ready to move onto routine bookkeeping!
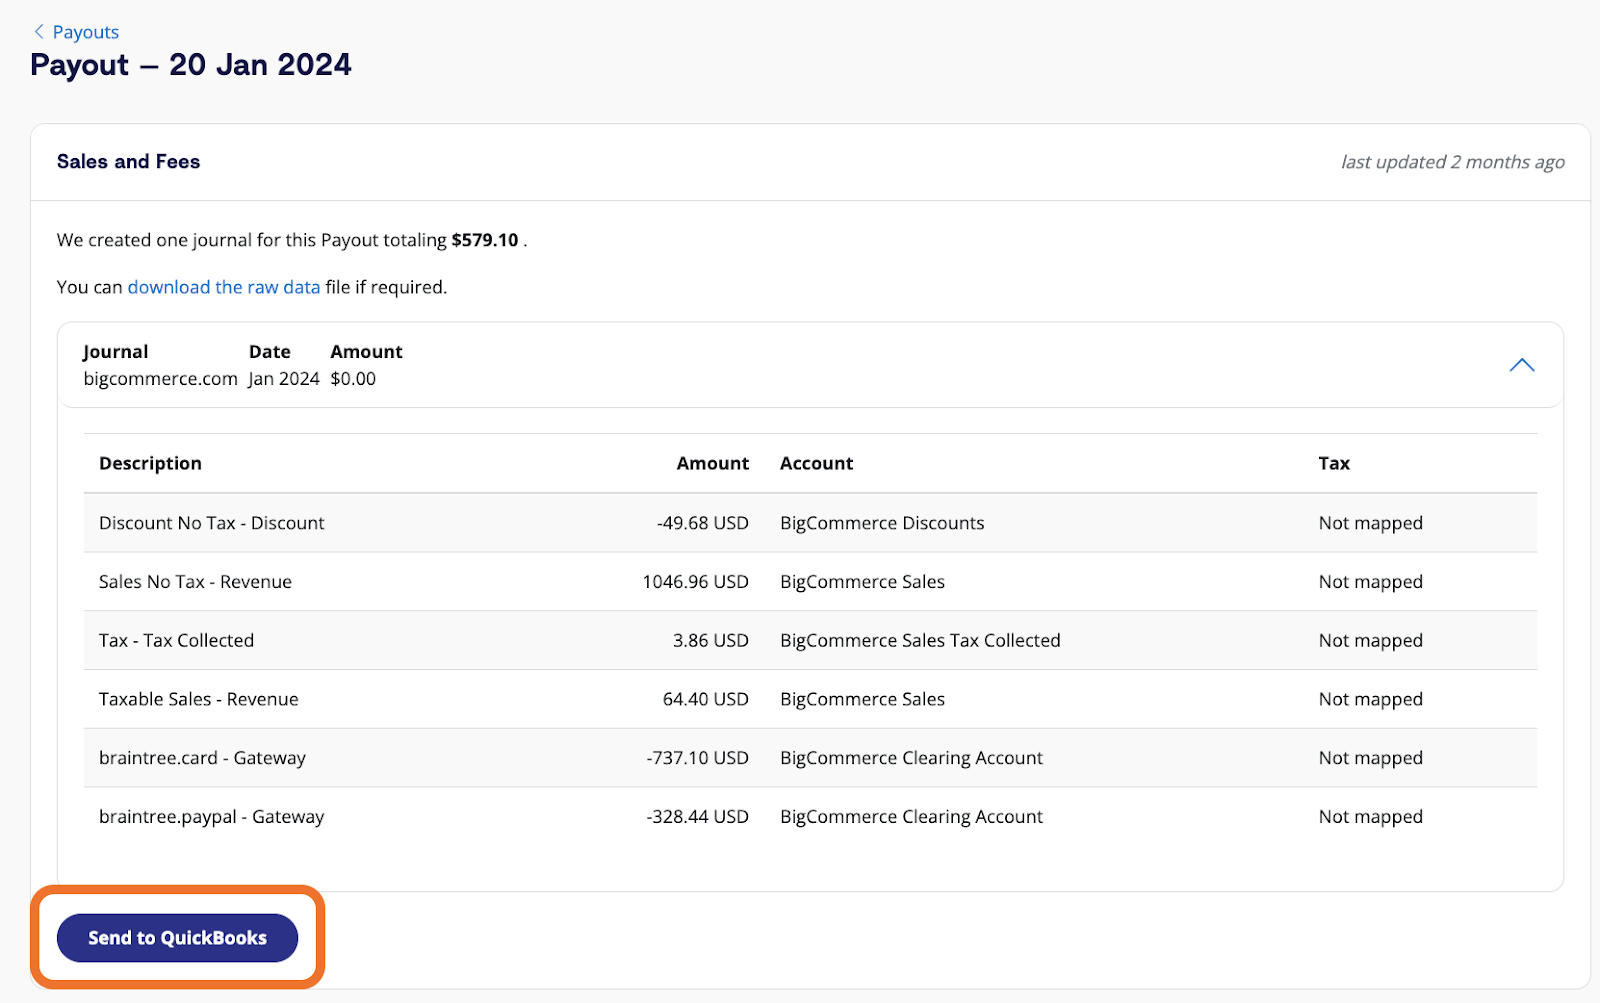
Go to the ‘Payouts’ tab in A2X. This is where you can see the daily payouts that A2X has fetched from BigCommerce. Click ‘Review’ to see the details of each payout.
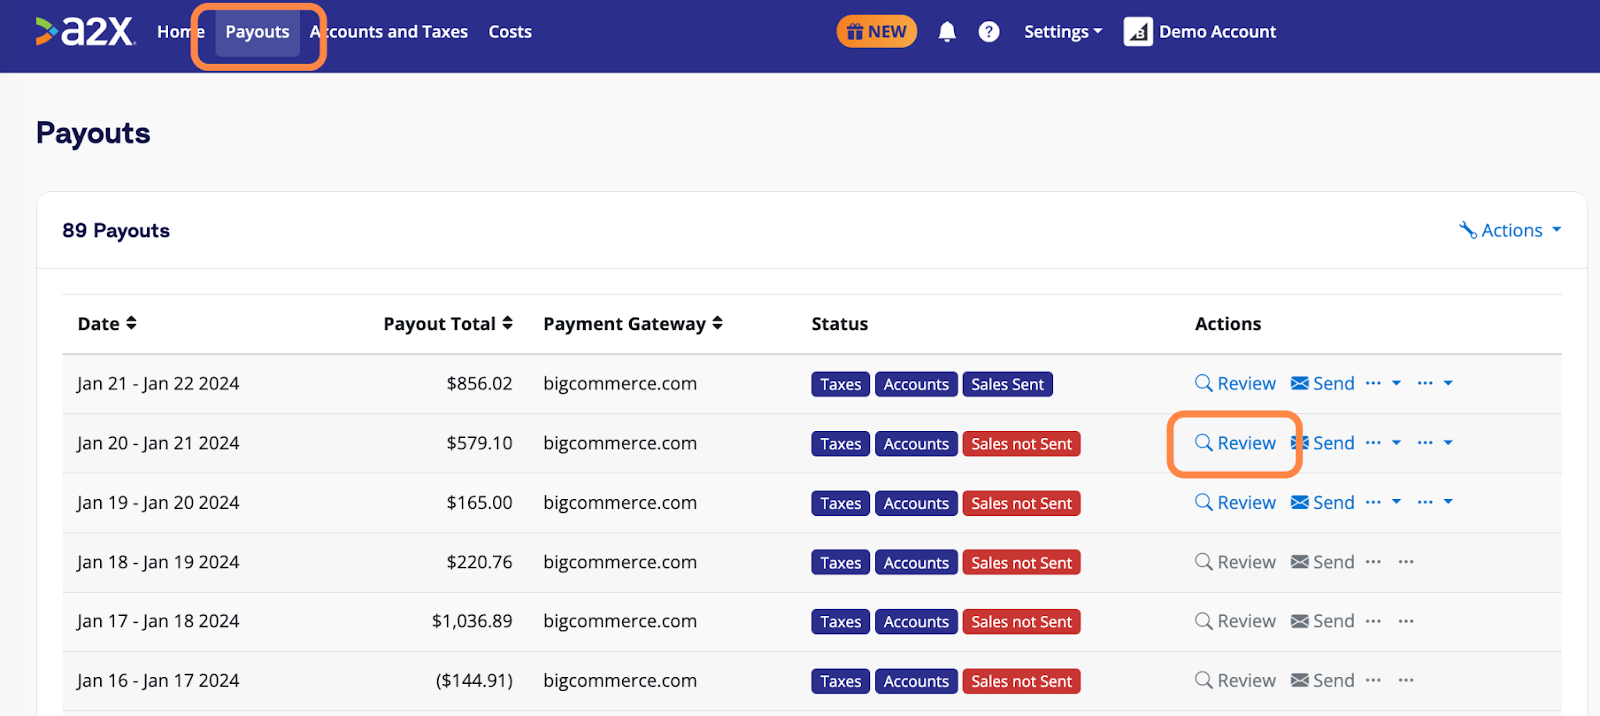
Review how each transaction has been mapped by A2X. If all looks good, click ‘Send to QuickBooks’.
Once you’re comfortable with this process, A2X also has an auto-posting feature that will automatically send payout data from A2X to QBO.
6. Reconcile in QuickBooks Online
This process can get complicated, so be sure to work with an ecommerce accounting professional to accurately reconcile your business accounts.
Log in to QuickBooks Online, and navigate to the BigCommerce clearing account (or, the clearing account for a particular payment gateway).
A2X entries will generally appear as debits in the clearing account.
Make sure that you have transferred the deposit from the payment gateway to the same account. For example, if you have a deposit in your bank account from PayPal, transfer this deposit to your PayPal clearing account. You can set up a rule for QuickBooks to do this automatically.
Once the clearing account balances from the A2X debit entry and the actual payment in QBO, the remaining balance can typically be allocated as payment processing fees. A manual entry must be created to account for those fees.
And there you go! BigCommerce presents some bookkeeping and reconciliation challenges, but A2X can help you overcome them and ultimately get accurate, detailed financials.
Ready to integrate BigCommerce and QuickBooks Online?
Try A2X for free!
Integrate BigCommerce and QuickBooks Online for accurate accounting
A2X auto-categorizes your BigCommerce sales, taxes, refunds, and more into accurate summaries that make reconciliation in QuickBooks Online a breeze.
Try A2X today