![How To Set Up Your Shopify Facebook Pixel [Tutorial]](/img/content/shopify.jpg)
How To Set Up Your Shopify Facebook Pixel [Tutorial]


Facebook advertising can be confusing, especially if you’ve never done it before.
Many features and a huge audience make for an effective marketing platform, but also a complicated one.
However, there is one feature that makes tracking and understanding the data from your ad campaigns super simple: Facebook pixel.
Here, we’ll explore the Shopify Facebook pixel integration – its benefits, how it works, how to set it up, and a few expert tips to help you make the most of your Facebook ad campaigns.
In this guide to Facebook pixels for Shopify:
Table of Contents
Learn how to manage your Shopify accounting the right way
If you want to scale up your Shopify business, you need reliable accounting. Discover the best tools, key tax information and how to ensure that your Shopify accounting is set up for success.
Download our free guide
Let’s dive in.
Advertising On Facebook in 2021: Does It Still Work?
Facebook is the most popular social media platform in the world, with over 2.7 million active users.
As a Shopify seller, taking advantage of Facebook’s enormous audience is a great way to grow your business:
Facebook has over 2.5 billion users, and several hundred million business users, which means that there is no platform in the world where you can reach such a broad audience. Especially at such a cheap price, although it has become more expensive compared to a couple of years ago.
Now posts from families and friends, as well as paid ads are practically the only thing you can see on your feed. Organic posts are now below 5% represented on the feed.
That is why our answer is that Facebook ads are absolutely worthwhile in 2021 as well as in previous years because they are the only way to improve brand awareness and reach a large number of customers.
And to make the most of the platform’s huge marketing potential, you’ll want to learn how to use the Facebook pixel.
What is a Facebook pixel and how does it work?
A Facebook pixel is a bit of code that functions as an analytics tool for your Shopify store.
The pixel can help improve the performance of Facebook ads for your products and your store’s marketing capabilities.
By setting up and integrating a Facebook pixel, you can:
- Measure and understand conversions on your website related to Facebook ads.
- Ensure your Facebook ads are shown to the right audience for specific products.
- Automatically promote the most relevant products to your site visitors.
- Learn about how people use your website and then optimize it based on your findings.
Here’s how it works:
When a person visits your website and takes an action, such as buying a product, the Facebook pixel recognizes and reports the action.
In doing so, it gives you an overview of how customers behave on your site after clicking on one of your ads.
As more conversions continue to occur on your website, Facebook will begin to use the data to deliver ads to people more likely to take specific actions (conversion optimization).
Why your Shopify store needs a Facebook pixel
Adding a Shopify Facebook pixel to your website will simplify, optimize, and streamline the Facebook marketing process.
Instead of manually researching (or guessing) who you should be targeting with your ads, the pixel can do the hard work for you.
On top of that, the Facebook pixel will work to help you continuously improve your advertising campaigns by informing you about which actions people take after they see them.
You’ll gain valuable information about your website visitors that will allow you to retarget and refine your Facebook ads for maximum efficiency.
And we’ve got some good news about the Shopify Facebook pixel – it’s super easy to add to your online store.
Keep reading to learn how.
Facebook Pixel Shopify Integration: How To Set It Up
Setting up your store with Facebook pixel is simple with these easy steps.
But first, there are a couple of things you should know before you begin.
Before connecting Shopify and Facebook pixel
To create Facebook ads, you’ll need a Facebook ad account.
And before you can create a Facebook ad campaign to track with Facebook pixel, you need to set up Shopify’s Facebook channel.
Once you’ve sorted out an ad account and set up the channel, you’re ready to add a pixel to your store.
There are two ways you can do this:
- Through the Shopify Facebook channel.
- By manually updating your website’s code.
We’ll first look at the steps for creating and adding a pixel using the Facebook channel.
Adding a Facebook pixel to your store with the Facebook channel
The Shopify Facebook channel makes it easy to create new Facebook pixels for tracking various elements of your store.
Step 1: Create a new pixel
To create a new Facebook pixel in the Facebook channel, simply open the pixel set-up box and click Create new.
Step 2: Enable customer data-sharing
In your Shopify admin, click Facebook in the Sales channels section. Click Settings, and then Data sharing settings.
In the Customer data-sharing section, select Enable data-sharing.
In the Choose data-sharing level, there are three levels to choose from, and they each affect what your Facebook pixel can do:
1. Standard
If you select the Standard sharing level, the pixel will track customer browsing behavior on your store. However, a browser-based ad blocker can prevent the Facebook pixel from sharing data.
2. Enhanced
If you select the Enhanced sharing level, the pixel uses Advanced Matching to extract your customer’s name, location, and email address, as well as the browsing behavior tracked in Standard mode.
Like Standard, a browser-based ad blocker may prevent the pixel from sharing data.
3. Maximum
If you select the Maximum sharing level, then your store will use Facebook’s Conversions API as well as the Facebook pixel.
On top of the benefits of the Standard and Enhanced sharing levels, the Maximum setting can’t be blocked by browser-based ad blockers, it extracts customers’ phone numbers and even shares customers’ personal information to match users on Facebook’s network.
Choose the option that you’d like to use. Then select your pixel from the list.
Step 3: Adding the pixel to your store
Click Confirm and your new Facebook pixel will be added to your store.
If you have added a Facebook pixel to your online store theme code in the past, then remove the Facebook pixel code from your online store once you’ve set up the pixel using the Shopify Facebook channel.
Step 4: Track customer data-sharing events
After you’ve added the Shopify Facebook pixel to your store, it will begin to track different customer events or actions.
This table shows which events your pixel automatically tracks within your store:
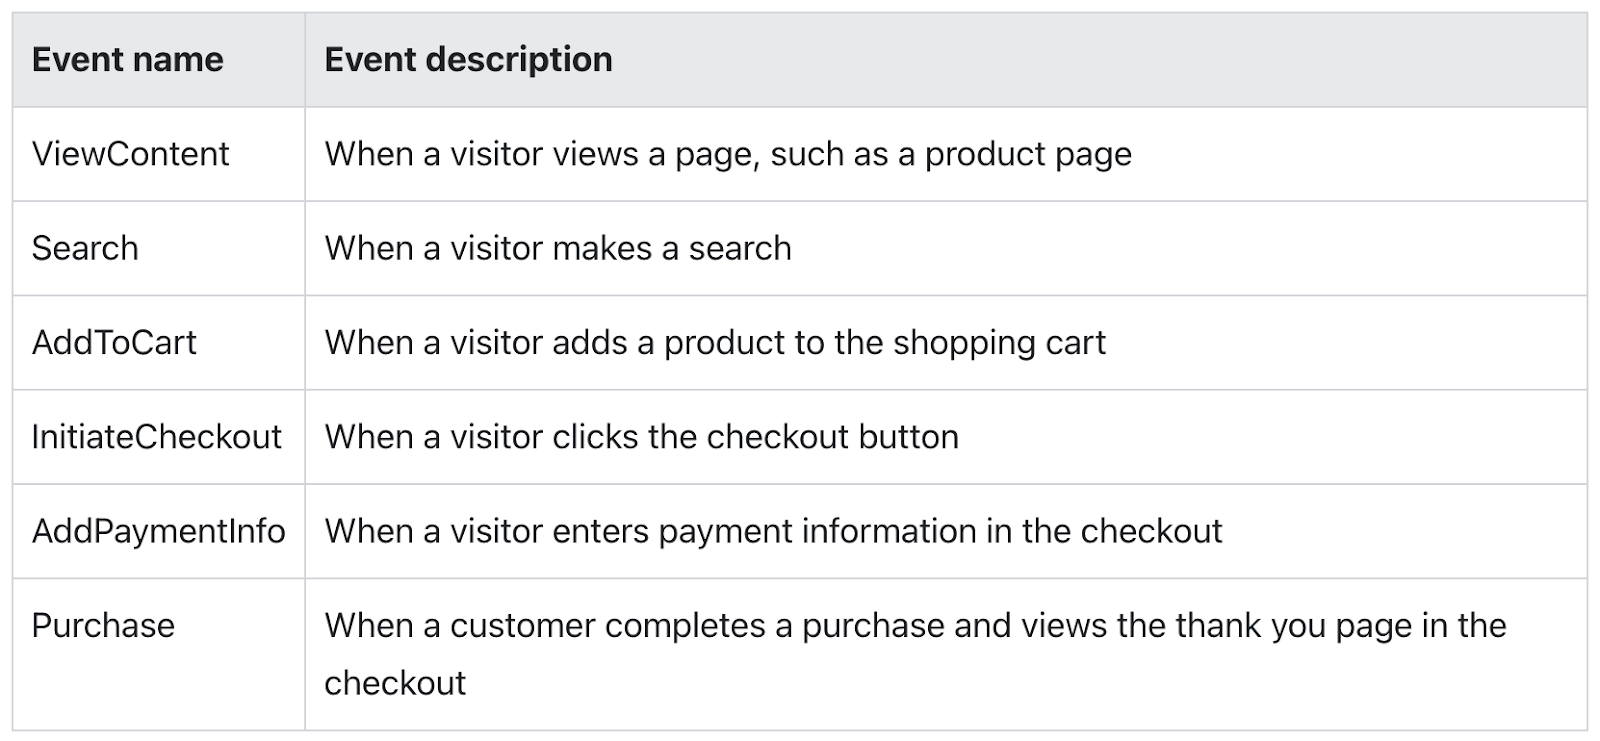
Source: Shopify.
Events that track an order value use an order’s subtotal, which excludes taxes and shipping costs.
Manually adding a Facebook pixel to your store using Facebook
You also have the option of creating a new pixel through Facebook’s Events Manager, and then manually updating your website’s code.
Step 1: Create a new pixel
Go to your Events Manager and click on the green and white “plus” symbol beside Connect data sources, then select Web.
Next, click Facebook pixel and then Connect.
Add your pixel name and then enter your website URL. Facebook will tell you if there are any easy setup options.
Click Continue to create your new pixel.
Step 2: Add the pixel code to your website
From Events Manager, select the pixel you wish to set up.
Click Continue pixel setup and then select Install code manually.
Copy the pixel base code then find the header of your website or locate the header template.
Paste the base code at the bottom of the header section, right above the closing head tag:

Source: Facebook
Click Continue.
Step 3: Add events
Using the Event setup tool, you can add customer data-sharing events and parameters without additional coding.
Alternatively, you can manually add pixel events using code. It’s up to you.
Finally, click Done.
Facebook Pixel Troubleshooting Tips
In case you need further assistance, these tips will help you resolve some of the more common Shopify and Facebook pixel challenges.
My Facebook pixel isn’t working
There are a few reasons why your Facebook pixel might not be working properly.
Luckily, the engineers over at Facebook have created a tool called the Facebook Pixel Helper to troubleshoot any problems you may have.
Simply install the Chrome plugin and click on the Pixel Helper icon to get started.
How to change or remove a Facebook pixel from your store
To remove or swap out your current Facebook pixel, open your Shopify admin and click Facebook. Then select Settings.
Under Data sharing settings, select Disconnect.
This will remove your current pixel. You are now free to connect another pixel or create a new one.
Managing your Shopify accounts the easy way
If you’re going to invest in advertising, you need to ensure that you’re making a return. You also need to track numerous other aspects of your business to make a sustainable profit and grow.
But deciphering your Shopify settlement statements isn’t always easy. There’s a tool that can automate it for you and fast-track your reconciliation and forecasting processes:
Get professional business accounts that you can rely on with A2X for Shopify.
Also on the blog
Learn how to manage your Shopify accounting the right way
If you want to scale up your Shopify business, you need reliable accounting. Discover the best tools, key tax information and how to ensure that your Shopify accounting is set up for success.
Download our free guide
