Shopify QuickBooks Integration: How to Set it Up for Accounting
Written by: Amy Crooymans
Last updated: August 19, 2026
If you’re researching how to integrate Shopify with QuickBooks Online, you’re likely after one outcome:
Automated monthly reconciliation and an accurate Profit and Loss Statement (P&L) that shows what your business sold, what it paid in fees, and what it owes in taxes.
Aka, no more scratching your head when what you see in Shopify doesn’t match in QuickBooks.
A Shopify payments payout, in one equation:
Gross sales + Shipping income + Sales tax collected + Gift card sales − Discounts − Refunds − Chargebacks − Shopify fees − Adjustments = Shopify payout (the net amount that hits your bank).
Additionally, orders paid through PayPal or other third-party gateways aren’t in this payout and need to be settled separately.
If you want that level of detail, which becomes useful during tax season or for those who need true financial visibility into their Shopify store, then you’ll need an integration solution.
Fair warning, no two integration solutions are the same. In this article, I’ll walk you through three options, from the most lightweight for simple, low-volume sellers… to the most robust for multi-channel, high-volume brands who need accurate, accrual accounting (or the accountants and bookkeepers that support them). I’ll also cover a question we’re hearing more every month: whether you can just ask ChatGPT or Claude to do your Shopify bookkeeping. (Short answer: they can help with the manual method, but they can’t reliably reconcile every month).
Key takeaways from this article:
- The right integration solution depends on volume and how accurate your books need to be. Low-volume sellers can get by with manual entry or a basic syncing app. Anyone closing books on accrual basis, attracting funding, or planning to exit needs detailed reconciliation that can handle multiple channels and large order volumes.
- A2X is the recommended route for most Shopify merchants. It posts one summarized journal per payout that matches the bank deposit to the penny, breaking out sales, fees, refunds, taxes, and gift cards into the right accounts automatically, and records tax correctly for your region (US sales tax, UK VAT, AU GST).
- Data-syncing apps like Intuit’s QuickBooks Connector work for smaller sellers but breaks down with order volume and complexity. The Connector posts every order individually (a sales receipt plus a fee expense per sale), and its payout deposit can only be reconciled once every one of those transactions has been reviewed and categorized. At low volume sales it’s fine; but becomes too hard to manage once you have any amount of scale.
- LLMs like ChatGPT and Claude can speed up manual entry, but they can’t replace an integration solution. They’re genuinely useful for consolidating Shopify reports and drafting journal entries, but they’re probabilistic tools with no connection to your payout or bank data. They can’t guarantee exact transaction coding, can’t see payout timing, and can’t reconcile to the deposit.
- Whichever method you pick, the chart of accounts and tax mapping decisions you make once will repeat every month forever. Getting them right upfront is the single highest-leverage step in Shopify QuickBooks integration.
How do I integrate Shopify with QuickBooks?
Shopify merchants have three options when it comes to a Shopify and QuickBooks Online integration:
- Connect Shopify to QuickBooks Online with an ecommerce accounting automation tool to categorize and reconcile your payout data on an accrual basis, like A2X
- Connect Shopify to QuickBooks Online with a data-syncing app, like Intuit’s QuickBooks Connector, that gets individual orders into your accounting software for manual categorization
- Manually enter data from Shopify reports into QuickBooks Online, either on your own or with help from an AI assistant like ChatGPT or Claude
We’ll break down how to do each of these methods below.
Connect Shopify to QuickBooks Online with ecommerce accounting automation tool, A2X
Unlike data-syncing apps that post individual orders and reconcile them one by one, A2X focuses on payout-level reconciliation. It summarizes your Shopify transaction data and sends one journal entry per payout to QuickBooks Online, ready to match against the bank deposit. The same engine works across Shopify, Amazon, eBay, Etsy, PayPal, and Walmart, so multi-channel sellers get a single reconciliation workflow instead of a different one per channel.
A Shopify payout doesn’t equal a single day of sales. It’s a batched amount covering several days of orders, minus fees, refunds, and adjustments processed during that window. Matching individual orders to a payout by hand is nearly impossible at any volume, and the timing makes it worse: payouts can settle on one date and deposit on another, often straddling a month-end.
A2X handles both sides. Each payout posts as a single summary that ties back to the bank deposit, with the journal dated to the settlement period so revenue lands in the right month even when the cash arrives in the next one. Critical for accrual accounting.
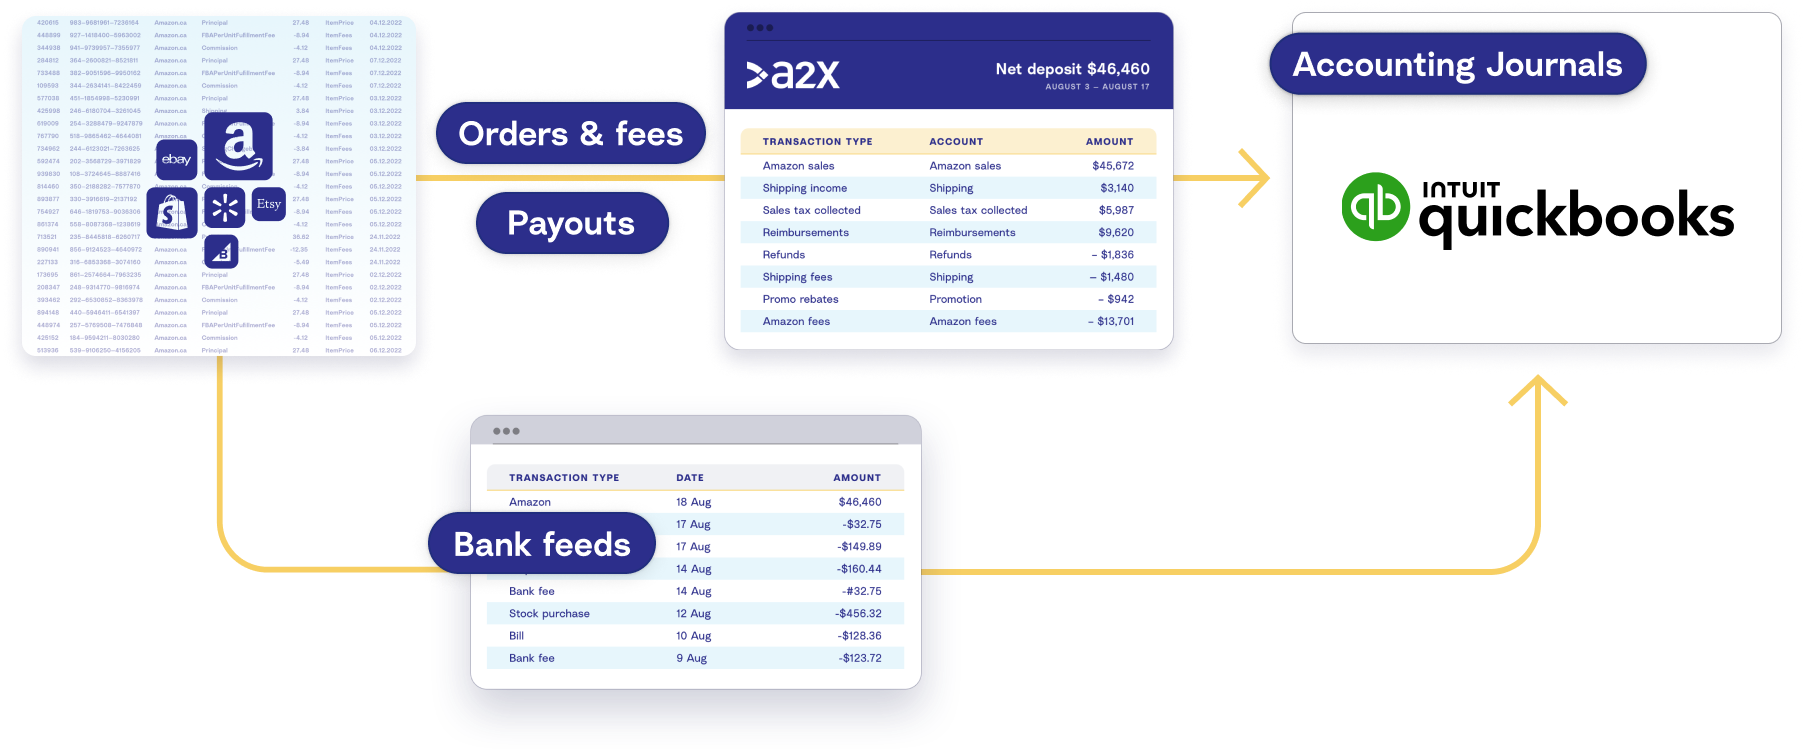
Step-by-step process to integrate Shopify with QuickBooks Online using A2X
Watch this video for a quick overview of how to integrate Shopify and QBO with A2X, then follow the steps below for more details:
Amy: If reconciling Shopify payouts in QuickBooks Online is part of your month, you know the problem already. What lands in the bank never matches what you sold, and reconciling by hand with a direct integration turns slow and unreliable once you're doing any real volume across channels. Here's how to fix that with A2X, so every payout reconciles in one click.
Let's start in QuickBooks on the bank transactions screen. Here's a deposit from Shopify Payments. The tempting thing to do is to code this whole deposit to a sales account. But it isn't just sales. It's sales, refunds, shipping, and tax all bundled into one deposit. Code it to sales, and your income is overstated, and your fees never show up as expenses. Your tax numbers end up wrong too
Amy: Getting this right means reconciling every payout properly. Surprisingly, getting that detail out of Shopify is manual and doesn't always line up. If you sell on more than one channel or have multiple currencies or different payment gateways, the job multiplies.
That's what A2X solves. It posts a summary to QuickBooks that matches the deposit exactly, and it reconciles every time. A2X handles the complications that come with ecommerce: multiple channels, different tax rates, payment gateways. It's how over 13,000 ecommerce businesses and their accountants and bookkeepers achieve accurate numbers in QuickBooks Online. Here's how to set it up.
Start by creating an A2X account at a2xaccounting.com. There's a free trial, so you can follow along with your own store.
Amy: Step 1, connect A2X to QuickBooks. Click Connect, log in to Intuit, and choose the company you want A2X to post to.
Amy: Step 2 is to connect your Shopify store. Log in with your Shopify credentials. If you're an accountant or bookkeeper, you can request access instead, and your client approves from their end.
Amy: Step 3 is an important one: mapping. Head to the Accounts and Taxes page. A2X will ask you a few questions about your business, then give you two options.
Assisted setup applies accounting best practice for you. It creates the accounts you need in QuickBooks and maps every transaction type. Custom setup lets you map each transaction to your own chart of accounts and tax rates.
If you're unsure, you could start with assisted setup, then customize it from there. I would also recommend checking this with your ecommerce accountant or bookkeeper to ensure everything's right for your business. See the A2X mapping page video for more tips and tricks on using the page.
Amy: Step 4 is to post your first payout. Go to the Payouts page, pick a payout, then click Review. You'll see every transaction type broken out with the account it'll post to and the tax rate, if applicable. And the total matches the deposit in your bank from Shopify. If you're happy with it, send it to QuickBooks.
Amy: The last step is to reconcile. In QuickBooks, go to the bank transactions screen and find the Shopify deposit. QuickBooks will suggest a match to the A2X entry. Click Match, and it's reconciled.
From there, A2X creates an entry for every payout, and you can set it to post automatically too. Now your Shopify reconciliations are taken care of in one click in QuickBooks.
If you haven't already, start your free trial at a2xaccounting.com. Free onboarding is included on every plan, so if you get stuck at any step, the team will walk you through it. And check out our other videos to get the most out of your A2X account.
The integration process with A2X is easy, and numerous resources are available if you get stuck. This includes a support center, online chat, dedicated support staff, and free onboarding for all new subscribers.
1. Sign up for a free A2X trial
Start the process by getting a free trial of A2X for Shopify to QuickBooks Online.
Select ‘Try A2X for free’ and choose the channel you’d like to connect A2X with first (e.g., Shopify).
You will then choose whether you want to sign in to A2X using your Google account (or email), or your QuickBooks Online account.
Follow the prompts to complete the signup process, and you will land on the A2X dashboard.
2. Connect to QuickBooks Online
On the A2X dashboard, you will be prompted to connect to your accounting software.
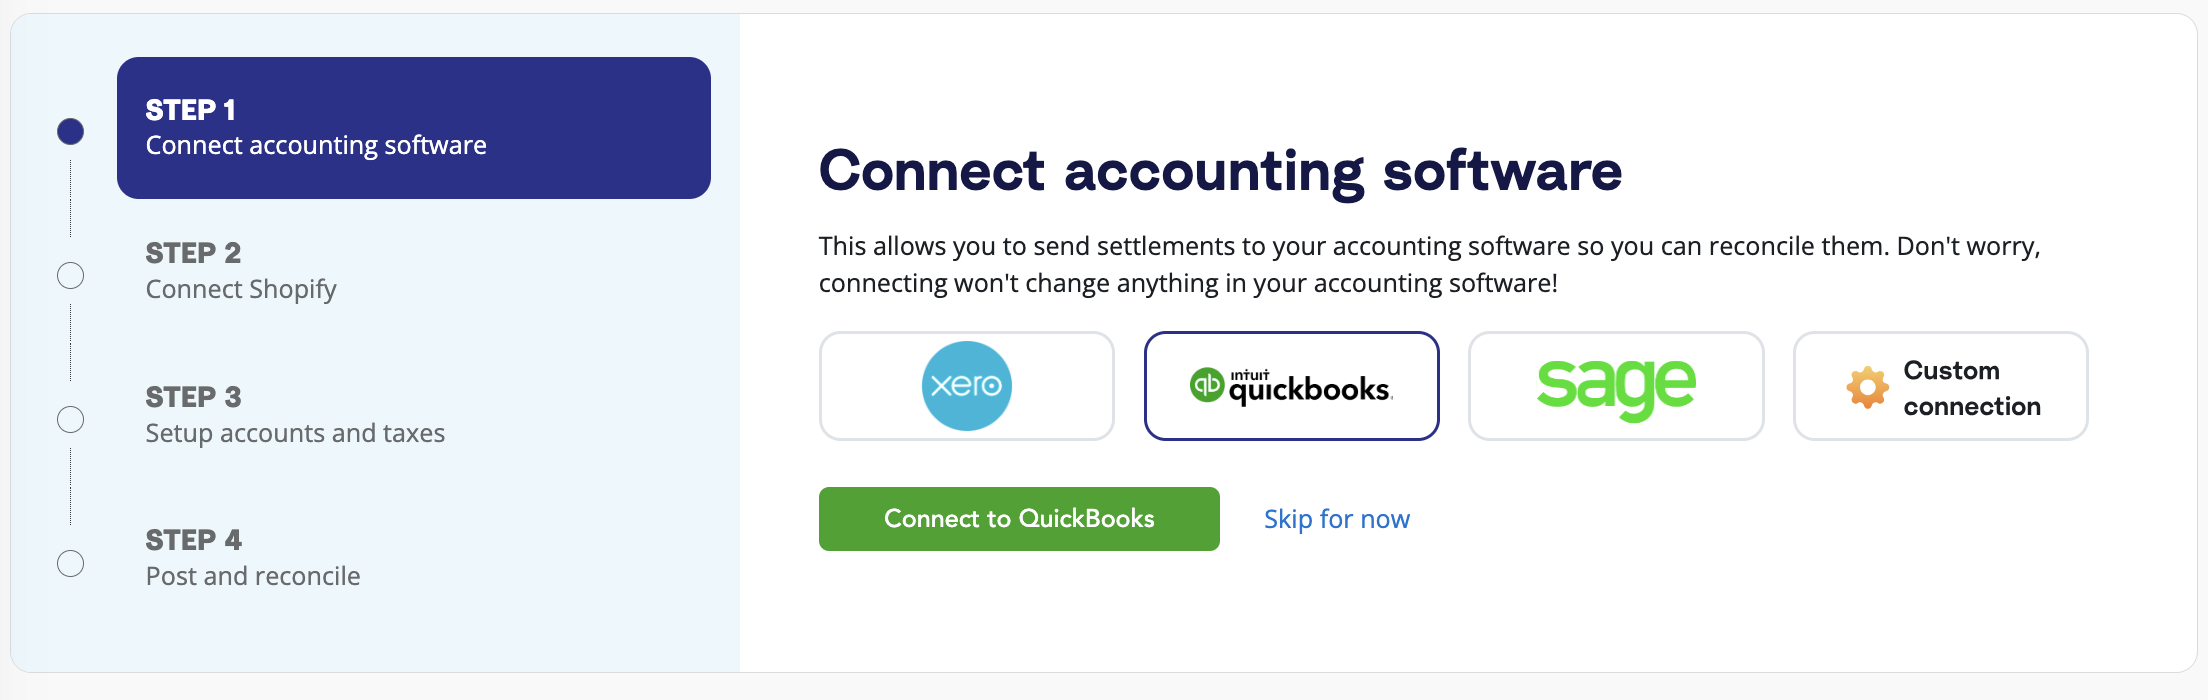
Click the QuickBooks logo, then click the ‘Connect to QuickBooks Online’ button.
You will be redirected to your QuickBooks Online account to grant permission for access by A2X. You will then be prompted to select the bank accounts that A2X should post journal entries to.
A2X will then return you to the A2X dashboard.
3. Connect to Shopify
Your next step is to connect to the Shopify store that you’d like to integrate with QuickBooks Online.
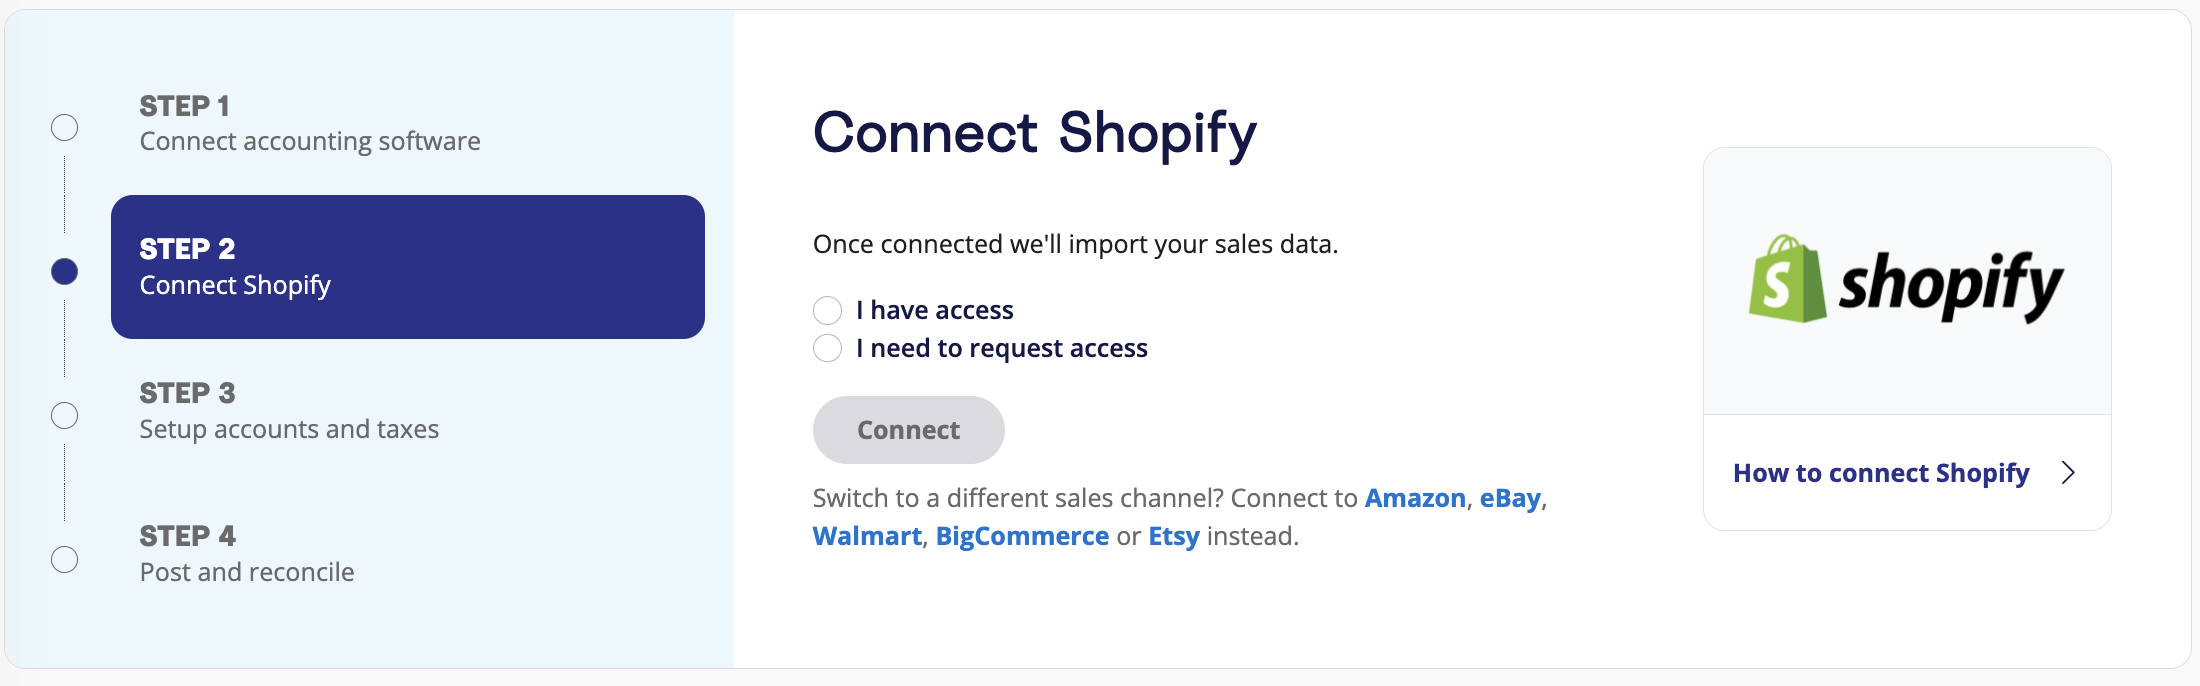
If you have access to the store, select ‘I have access’ and then click ‘Connect’.
- Enter your store’s name and click ‘Connect’.
- You will be redirected to your Shopify store, and it will ask for permission to allow A2X access.
- After granting permission, A2X will return you to your A2X dashboard, and your first payouts will automatically begin populating (in the ‘Payouts’ tab). This could take as little as 10-20 minutes for smaller stores and up to a few hours for larger stores.
If you do not have access to the Shopify store (e.g., you are an external accountant or bookkeeper), click ‘I need to request access’, then ‘Connect’, then follow the prompts to have the store owner/manager provide A2X with access.
4. Map accounts and taxes
Your next step is to set up your accounts and taxes mapping in A2X.
This is the process of categorizing your Shopify transactions (e.g., sales, refunds, sales tax, gift cards, etc.) to the correct accounts in QuickBooks Online.
A2X can automate the accounts and tax mapping process for you using the assisted setup feature.
We recommend working with an accountant or bookkeeper with ecommerce experience for this step to make sure you have everything coded according to your store’s needs.
Once you set this up, A2X will automatically map your Shopify transactions to QBO according to these settings for every payout moving forward – which makes accounting quick and easy.
5. Post & reconcile
Once you’ve mapped your accounts and taxes, you’ll rarely have to worry about this step again.
All you’ll need to focus on from here on out is posting and reconciling your Shopify payouts from A2X to QuickBooks (A2X can also automate this step using our Auto-posting feature).
To post to QuickBooks, go to the ‘Payouts’ tab in A2X. Here, you’ll see the Payouts screen, which lists all of your recent Shopify payouts.
Click ‘Review’ beside a payout.
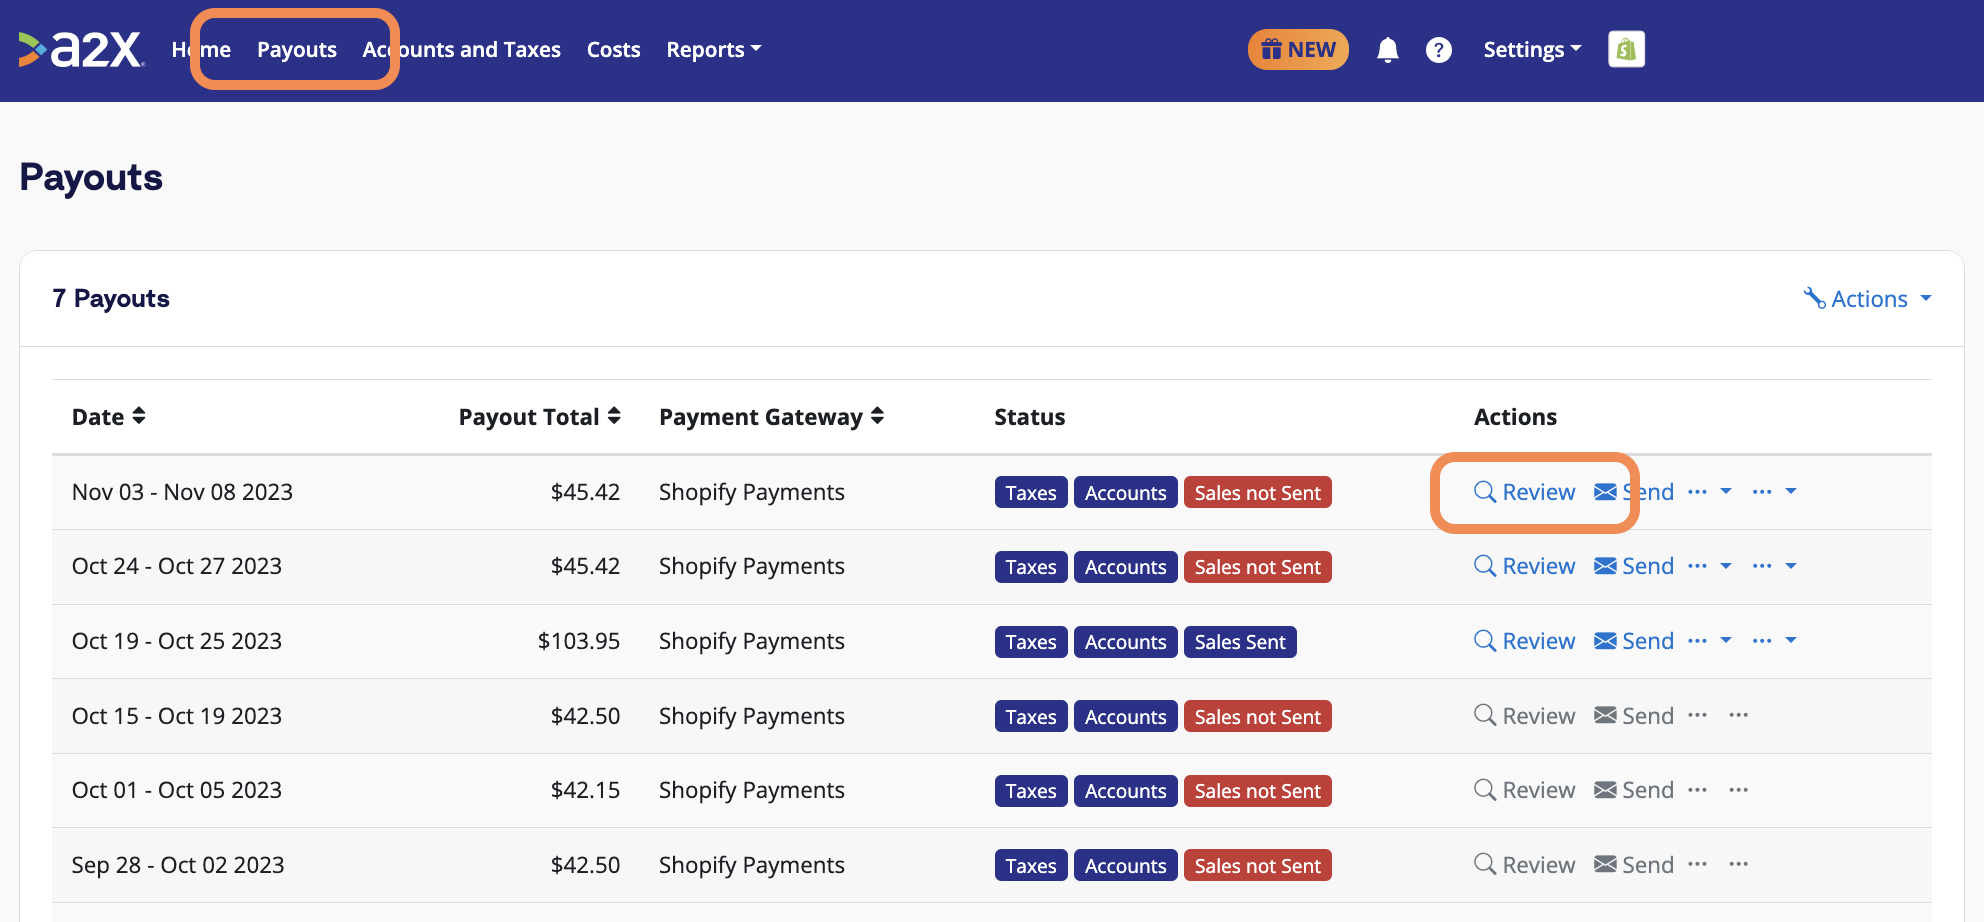
You’ll be able to see how A2X has categorized the transactions according to your accounts and tax mapping settings.
If everything looks good, click ‘Send to QuickBooks’ below the payout details.
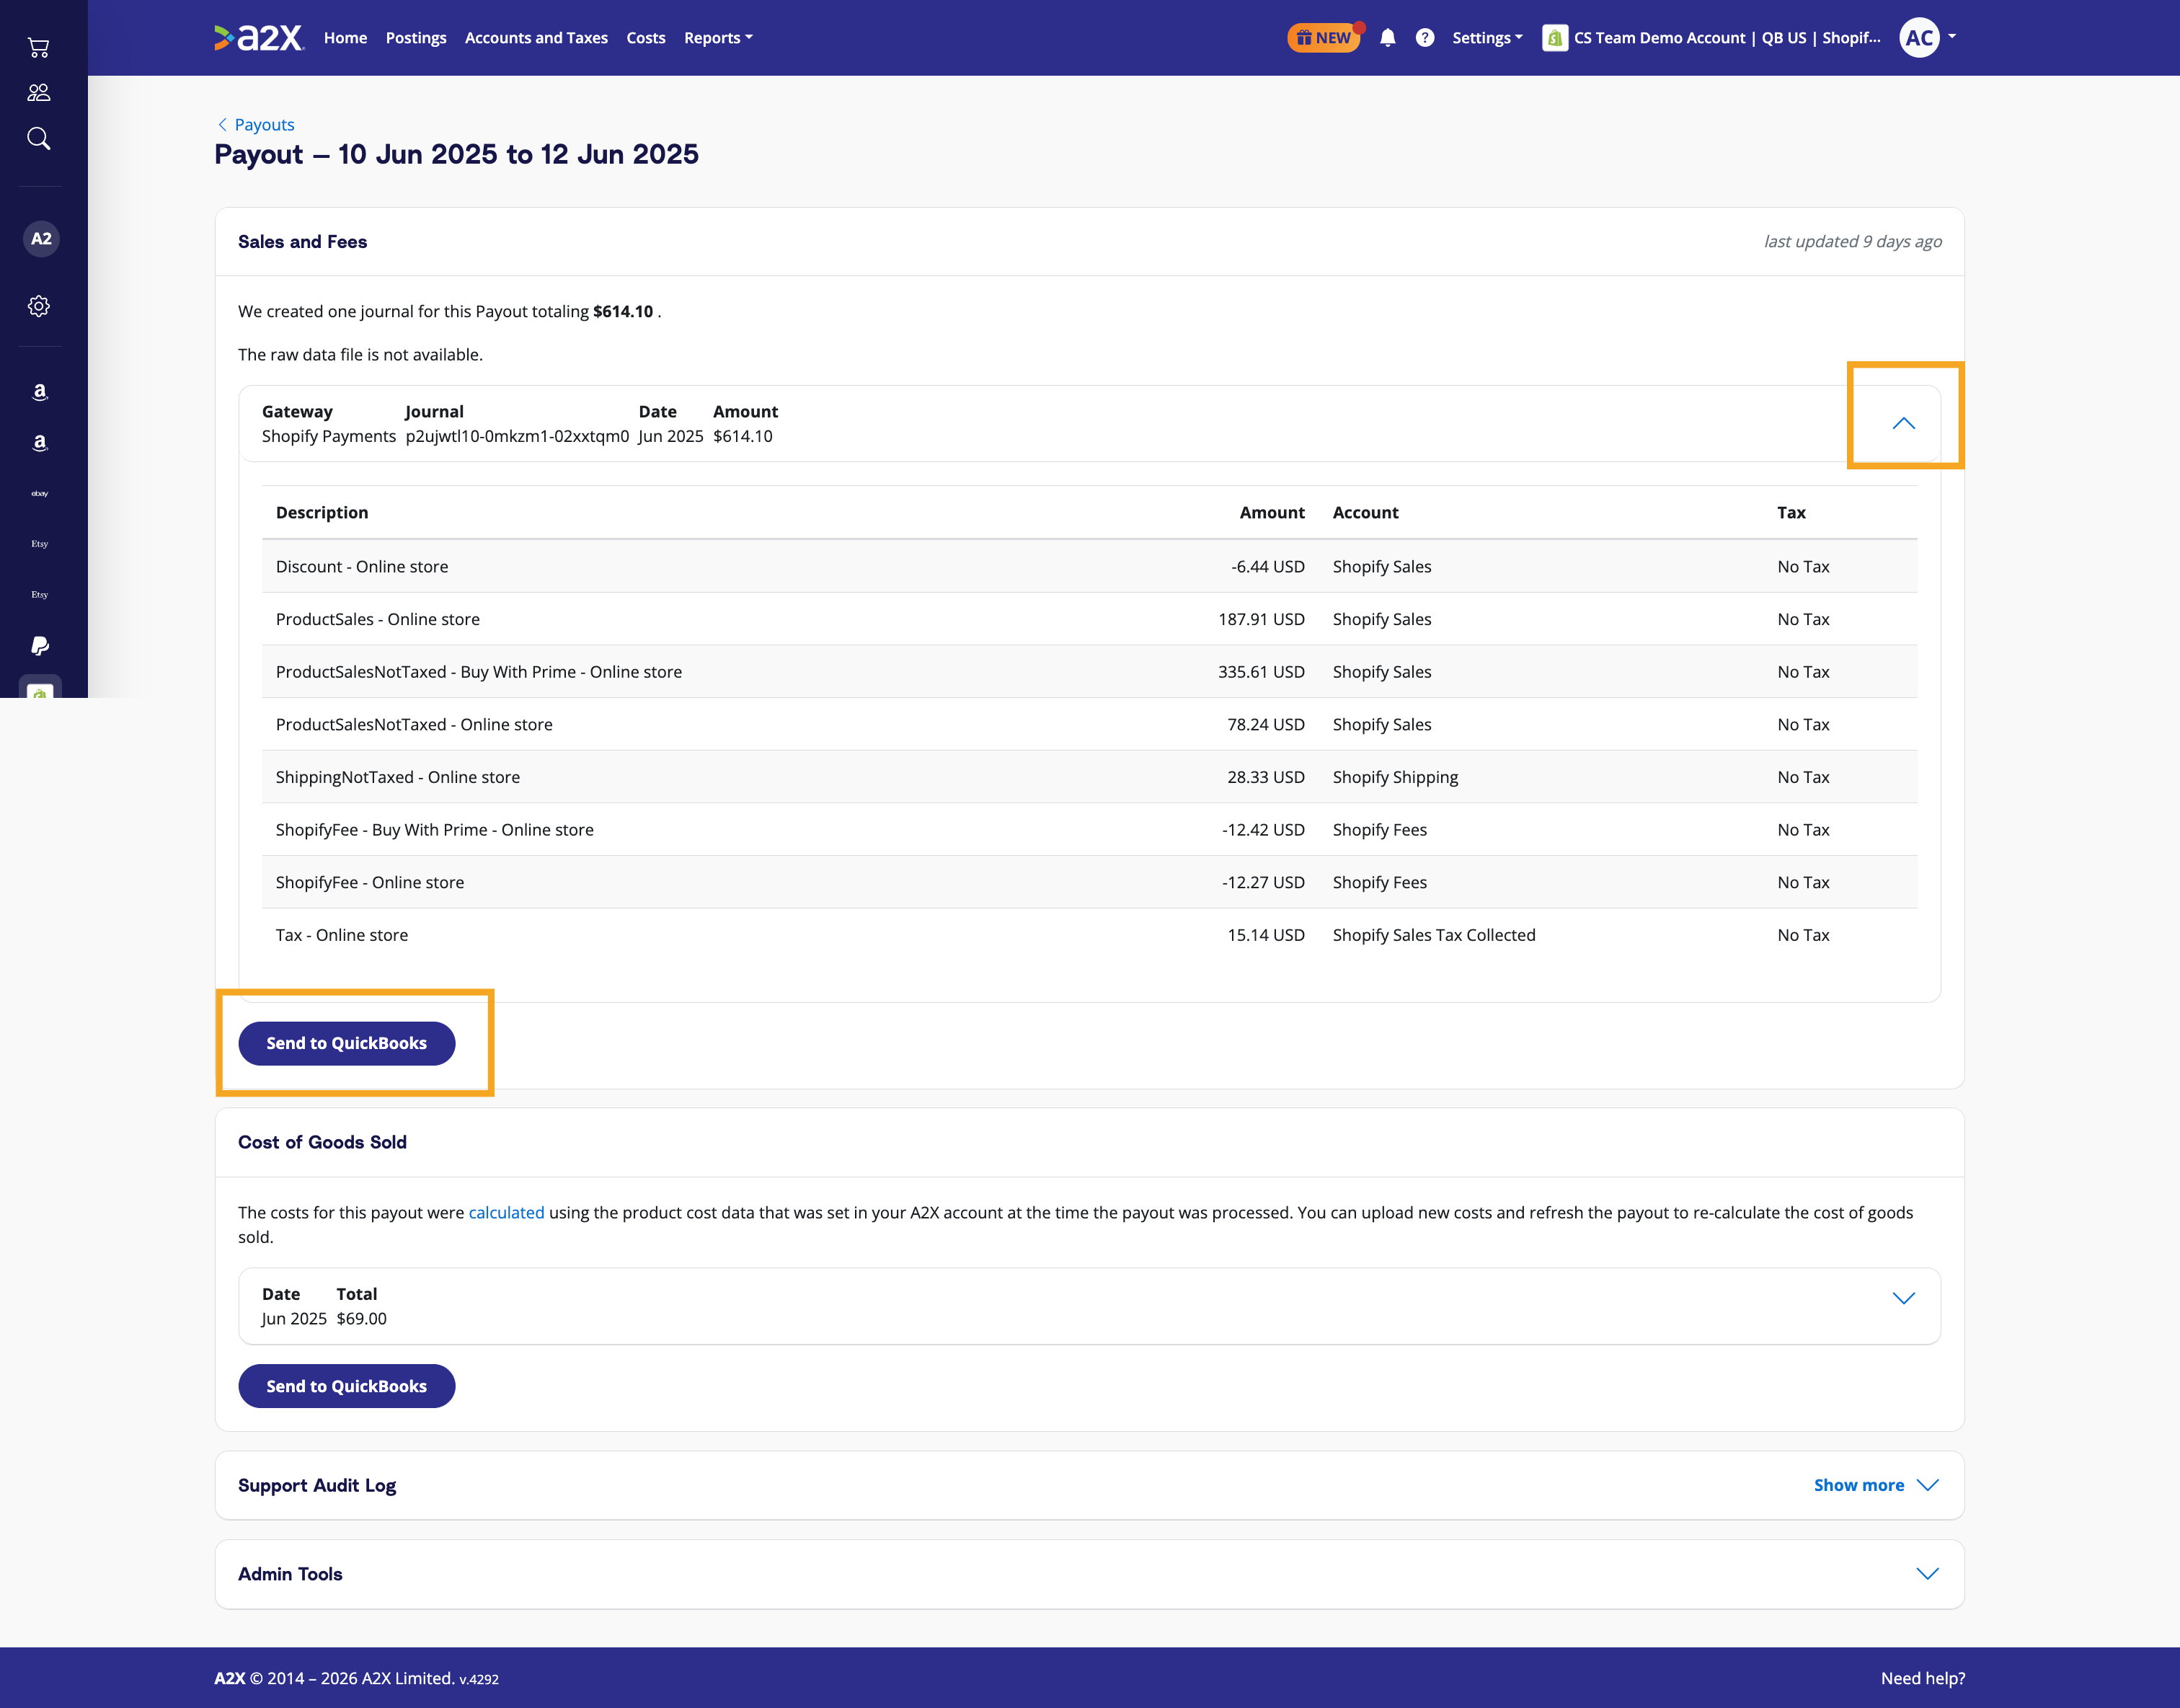
The payout will then be sent to QuickBooks as a journal entry.
Find the corresponding payout in the QuickBooks bank feed, and you should see the A2X entry beside it, ready to be matched!
Click ‘Match’ in QBO, and reconciliation for this payout is complete.
The Shopify Reconciliation Report: A2X’s commitment to accuracy
A2X is designed not only to simplify Shopify accounting, but also to help ensure that your numbers are accurate.
Despite A2X’s core capabilities, we recognize that discrepancies can still occur due to complicated orders that don’t follow a “usual pattern”, third-party apps that can change order timelines, and changes in the Shopify API that can impact how data is delivered or categorized.
If you do see a discrepancy between A2X’s summaries and Shopify data, you can use the A2X Shopify Reconciliation Reportto better understand and account for the difference.
Without this tool, it could take hours of manual work to identify what might be causing your numbers not to balance.
No integration tool can be 100% accurate, but A2X is as close as it gets.
Benefits of using A2X
Because it’s a specialist tool, using A2X to integrate your Shopify store with QuickBooks Online has many benefits that can help automate your accounting process and have accurate data in your QuickBooks Online account.
It understands transaction types
One of the most significant advantages of A2X is that it can accurately identify and categorize different transaction types, such as refunds, discounts, and shipping fees. This means your financial data comes from Shopify, is accurately categorized into the correct transaction type by A2X, and then pushed through to QuickBooks Online. The final step is reconciliation, which you can do in one click thanks to the categorization A2X has already done.
It’s incredibly accurate and automated (saving time and errors)
Once integrated, A2X automates your accounting process, saving you hours you can use to focus on other aspects of your business. And, because A2X is an automation tool, it takes care of the error-prone task of manual data entry, so you don’t have to worry about mistakes in your financial records.
Order details are attached to the entry
When using QuickBooks Online, you want to avoid overloading your account with unnecessary data but still maintain enough to be able to access order details if needed. A2X achieves this by attaching the order details to each entry, which lets you quickly get information about individual orders but doesn’t needlessly bring over data that could bog down your system.
Capture all payment gateways
Complete data is critical to Shopify accounting. If you use third-party payment gateways for your Shopify store, A2X will capture all transactions from all payment gateways.
Customize it for your business
A2X is highly customizable. While you can use the generic A2X-recommended list of mapping accounts, you can also tailor this to meet the unique needs of your business—it’s up to you.
Fantastic support when you need it
A2X has various support center articles to help with the Shopify to QuickBooks Online integration. It also has a blog and ecommerce accounting hub where you can learn more about the ins and outs of ecommerce accounting beyond your integration. A2X is also renowned for its excellent customer support team, so you can get help quickly if you ever encounter an issue or have a question.
Challenges with using A2X
Set-up investment
With any automation tool, the value compounds when you set it up correctly the first time. For a time, folks perceived A2X’s setup process to be somewhat time consuming, especially for custom mappings. That said, things have changed. The sign-up process is now incredibly smooth, with free onboarding available on every A2X plan.
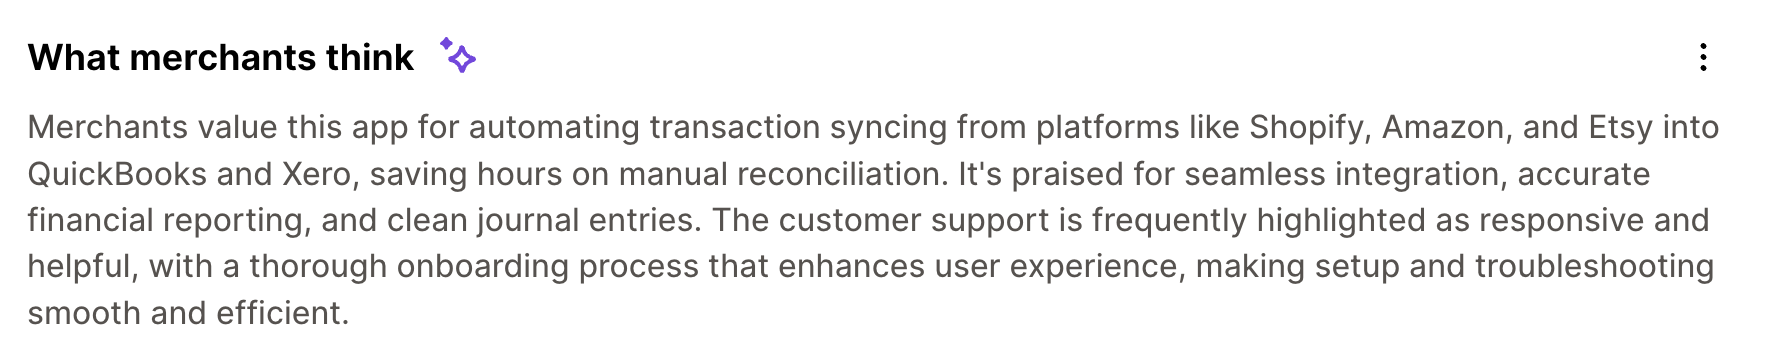
Here’s what the AI Overview on the Shopify App Store has to say (which is pulled from 337 reviews):
Merchants value this app for automating transaction syncing from platforms like Shopify, Amazon, and Etsy into QuickBooks and Xero, saving hours on manual reconciliation. It’s praised for seamless integration, accurate financial reporting, and clean journal entries. The customer support is frequently highlighted as responsive and helpful, with a thorough onboarding process that enhances user experience, making setup and troubleshooting smooth and efficient.
Start the integration process today by getting a free trial of A2X for Shopify now.
Why A2X is a top-rated app for connecting Shopify and QuickBooks Online
A2X has over 300 five-star reviews in the Shopify App Store, and over 550 five-star reviews in the QuickBooks App Store.
Here’s what some of our customers have to say:
A2X has been an invaluable resource for consolidating our Accounting on a few different platforms (Paypal, Shopify, Amazon and Walmart.) Their customer service responds quickly and efficiently. It really has been a huge time saver in terms of reporting. Highly recommend them.
The A2X platform is a must have to categorize your Shopify payouts. Making a stressful task, not stressful at all. Their customer service will ensure you have a great experience and that your numbers align correctly.
Great product and great customer service. I use a few of these types of programs for various customers and A2X is by far the best. It is a little pricier, but worth it for the functionality and customer service, especially if you are tracking COGS without inventory. Highly recommend.
This app is so easy to use and much better than the Shopify native connection to QBO. They also have great customer service. Highly recommend.
Connect Shopify to QuickBooks Online with the QuickBooks Connector (or another data-syncing app)
When visiting the QuickBooks App Store, you’re likely to see Intuit’s own QuickBooks Connector front and center. It’s a free integration, and for small, US-based brands with low order volumes, it’s an acceptable solution.
The Connector posts every order individually. Each sale becomes a sales receipt plus a fee expense in QuickBooks Online, and each payout becomes a deposit bundling those transactions for matching against your bank feed.
That said, there’s a catch.
The deposit can’t be reconciled until every order inside it has been reviewed and categorized. That’s fine at 50 orders a month, a chore at 500, and nearly impossible at 5,000.
And even if you’re a small seller today, ask yourself “how many orders a month will I have in a year?” If the answer is more than you’re selling now, choose an integration that scales with you.
How to set up the QuickBooks Connector
- Install the Connector: In QuickBooks Online, go to the Integrations section, find the Shopify Connector by QuickBooks app, and select it.
- Connect your Shopify store: Enter your original Shopify store URL (my-store.myshopify.com), sign in to Shopify, and authorize access.
- Review your app settings: Choose the date to start importing orders from (up to 1 year back), the deposit account where Shopify payouts land, and whether to enable automatic posting, product tracking, and customer tracking. The Connector creates default accounts and items (“Shopify Sales Item,” “Shopify Customer,” and so on) that you can swap for your own in settings.
- Review the first import: Imported transactions land in a For Review queue. Transactions with complete information can be confirmed quickly; those missing customer, product, or account details need you to fill in the gaps before they post. Check how the first batch handles refunds, gift cards, and taxes before trusting it.
QuickBooks Connector benefits
It’s free
The Connector is included with QuickBooks Online at no extra cost. For a new store doing a handful of orders a month, free is a reasonable place to start.
It’s built and maintained by Intuit
The Connector lives inside the QuickBooks interface you already use.
QuickBooks Connector challenges
Every order becomes entries in your books
Each sale posts as a sales receipt plus a fee expense. At a few hundred orders a month, that’s fine. At thousands of orders a month, your QuickBooks file fills with tens of thousands of transactions a year, reports slow down. Most ecommerce accountants advise keeping order-level detail in Shopify, where it belongs, and keeping the ledger summarized.
Reconciliation is gated on per-order review
The Connector does create a payout deposit to match against your bank feed, but you can only add that deposit once every individual transaction inside the payout has been reviewed and categorized. Transactions missing a customer, product, or account mapping sit in a review queue until you resolve them, and some payout adjustments need accounts selected manually. In other words, the bank match exists, but it’s order by order. At volume, working the review queue becomes a daily bookkeeping chore.
Default accounts instead of transaction-type mapping
The Connector maps to a set of default accounts and catch-all items (“Shopify Sales Item,” “Shopify Customer”) that you can swap for your own, but you don’t get granular control over how each transaction type is categorized the way a dedicated accounts-and-taxes mapping provides. If your accountant wants shipping income, gift card movements, or channel fees broken out a specific way for your chart of accounts, you’ll be working within the Connector’s structure rather than your own (or your accountant’s).
Tax treatment may be too simplistic for your situation
The Connector handles US marketplace taxes and merchant-liable taxes automatically, which covers common US setups. Sellers dealing with VAT or GST registration, multiple tax jurisdictions, or specific mapping requirements for their tax module will find less flexibility than the regional configurations described later in this article.
Single channel
The Connector connects Shopify. If you also sell on Amazon, eBay, Etsy, or Walmart, you’ll need a different solution per channel, each with its own logic and review queue, instead of one reconciliation workflow across all of them.
Manually enter data from Shopify reports into QuickBooks Online
It’s possible to manually get your Shopify data into QuickBooks Online. In other words, exporting the data from Shopify, manipulating it in Excel, and posting a journal entry in QuickBooks. As you can imagine, it’s time consuming and error prone, and not a viable solution for high order-volume sellers (Excel can struggle with that amount of data). That said, some sellers, especially small ones, take this approach.
Now, you might be asking yourself “can’t AI tools like ChatGPT and Claude do a lot of this work for me?”. Yes, kind of, but with major limitations, especially as you scale.
In this section, I’ll cover both the manual approach and the AI-assisted version.
How to manually record Shopify data in QuickBooks Online
The manual method runs on two Shopify reports, and each answers a different question. The payout export tells you what actually hit your bank: settlement-dated, fees itemized, Shopify Payments only. The Finances Summary tells you what you sold: order-dated, every payment gateway, broken out by category. Mixing them up is the number one reason DIY Shopify books don’t reconcile.
Start with the payout side, because that’s what you’ll match in the bank feed:
- Open your payouts: In your Shopify admin, go to ‘Finance’, then select ‘View payouts’.
- Select a payout: Click the payout you want to record. You’ll see its full breakdown: charges, refunds, adjustments, fees, and the net amount deposited.
- Export the transactions: Click ‘Export’ to download a CSV. It includes Amount, Fee, and Net columns for every transaction in the payout.
- Consolidate: Group the transactions by type (sales, shipping income, tax collected, refunds, fees) so you have one total per journal line. A pivot table works well here, or paste the CSV into an AI assistant and ask it to group the totals (more on that below).
- Open QuickBooks Online: Click ‘New’ in the top left corner, then select ‘Journal Entry’.
- Map the data: Map each total to the corresponding account in your journal entry, and date the journal to the payout’s settlement period so revenue lands in the right month. If you still need to create a Chart of Accounts, do that first.
- Review and match: Check that debits equal credits and that the journal nets to the deposit amount, then save. When the payout appears in your bank feed, match it to the journal
If Shopify Payments is your only gateway, the payout journals above are your complete books: summarized, categorized, and reconciled to each deposit. Add the Finance Summary report (under ‘Analytics’, then ‘Reports’) if you want to cross-check your month’s revenue by order date. The summary itself is view-and-print only; click through any card to its detailed report and use the ‘Export’ button there to download a CSV.
If you take payments through other gateways like PayPal, there’s more work to do, because those sales never appear in a Shopify payout. The gateway’s own reports cover the money side: gross, fees, and net per transaction, so you can reconcile its deposits the same way. What they can’t tell you is what each charge was made of. The split between product sales, shipping, and tax lives in Shopify, because that’s where the order is. Booking those sales correctly means combining Shopify’s revenue breakdown (from the detailed finance reports) with the gateway’s fee data.
Can ChatGPT or Claude do my Shopify bookkeeping?
A growing number of sellers are pasting Shopify reports into ChatGPT or Claude and asking it to build the journal entry for them. We’ve tried it ourselves! And to be fair, these tools are genuinely good at parts of this job, and if you’re doing manual entry anyway, they can definitely speed up the process.
Here’s what an AI-assisted workflow typically looks like:
- Export your Shopify Finances Summary (and payout report) for the period.
- Paste the data into ChatGPT or Claude and ask it to consolidate the figures into journal entry lines: sales, shipping income, sales tax collected, gift cards, discounts, refunds, and fees.
- Ask it to explain any line you don’t understand, or to check that debits equal credits.
- Enter the resulting journal manually into QuickBooks Online, and match it against the payout in your bank feed.
Where AI genuinely helps with Shopify accounting:
- Consolidating reports. Turning an export into grouped totals is exactly what these tools are good at, and it replaces the pivot table step for most people.
- Merging multiple sources. If you sell through more than one gateway, the month is spread across a Shopify export, a PayPal statement, and a bank feed. Handing an assistant all 3 and asking it to line them up is tedious work it does well.
- Structuring the journal. An AI assistant knows what a balanced journal entry looks like and can draft the debit and credit structure for you, including which side each line belongs on.
- Explaining the concepts. If you don’t know why gift card sales are a liability rather than income, or what a clearing account is for, an AI assistant is a patient teacher. This alone makes the manual method far less intimidating than it used to be.
- Sanity-checking. “Do these debits and credits balance?” and “does this total match my payout?” are questions it can answer instantly.
Where AI fails with Shopify accounting:
- It’s probabilistic, not deterministic. Large language models predict likely text; they don’t compute. Ask one to sum a few hundred rows and it will usually be right, but “usually” is a disqualifying word in accounting. A transposed digit or a dropped row produces a journal that’s off by $1,400.82 with no error message and no audit trail. And you won’t find out until reconciliation fails, or worse, until it doesn’t and the error compounds for months. Scary when you consider the IRS, CRA, ATO, or HMRC implications.
- It only sees what you paste. The assistant has no connection to Shopify or your bank. It doesn’t know that a payout straddled month-end, that a refund belongs to last period’s sales, or that a chunk of your orders settled through PayPal instead of Shopify Payments.
- It can’t reconcile. Reconciliation means proving your books match what actually hit the bank. An AI assistant can format a journal, but it has no idea what Shopify actually paid you. You’re still doing the matching yourself.
- No consistency month over month. Ask the same question in March and April and you may get different account treatments. Bookkeeping runs on doing the same thing the same way every period; a chat window has no memory of the mapping decisions you settled last month unless you re-teach it.
- Your financial data goes into a chat window. Depending on your settings and plan, pasting revenue data into a consumer AI tool may have privacy implications worth understanding before you make it a monthly habit.
TL;DR Don’t use it as the system of record, and don’t trust it with anything that needs to be exact and provable when the tax authorities come knocking. When the volume grows past the point where checking the AI’s work takes as long as doing the work, that’s about time you’ve outgrown the manual method, AI-assisted or not.
Benefits of manual data entry
Free (excluding time)
One of the main advantages of manual data entry is that it’s free. It requires time every month to complete, which varies with the size of your business, but it could save money compared to paying for an integration.
AI assistance lowers the skill barrier
With an AI assistant handling consolidation and journal structure, the manual method is more accessible to non-accountants than it’s ever been.
Challenges with manual data entry
A lot of data
Before manually entering your Shopify data into QuickBooks Online, consider the amount of data to account for. This is especially true at high sales volume. Once your store grows, the amount of information you’re inputting (or checking, if AI drafted it) becomes overwhelming.
Numerous transaction types and payment gateways
Many transaction types occur in Shopify, such as refunds and exchanges, and each payment gateway comes with its own data that must make it into QuickBooks Online. Whether a human or an AI does the first pass, every type has to be caught and coded correctly.
Difficulty with month-end crossover and getting to balance
Because Shopify doesn’t pay out as sales happen, timing differences make the month-end crossover tricky. All transactions from the previous month need to be accurately recorded, or getting your records to balance will be challenging, frustrating, and time-consuming.
Difficult to reconcile to what you’ve been paid
Due to payment cut-offs, many transaction types, and other complications, getting your entry to balance against the money Shopify actually deposited can take a lot of work. Ask anyone who has tried to build a manual Shopify journal by hand.
Takes time and invites error
Manual entry on a new store with few sales is manageable. It becomes unmanageable when a store starts to scale. One mistake, with no audit trail can throw your financials off.
The exports cap what’s possible.
The data is only as good as the reports you can get out of Shopify, and the report layer has real limits. The payout CSV covers Shopify Payments only. The payout reconciliation report runs on a 3-day data delay, exports as a PDF, and by Shopify’s own description “isn’t a statement of revenue for accounting purposes.” Some detailed reports cap their CSV at one month of data, and large order exports arrive by email hours later. No amount of work or AI skill recovers data that was never in the export.
Shopify-QuickBooks integration: Regional & tax considerations
When integrating Shopify with QuickBooks, it’s important to account for regional tax requirements (VAT, GST, sales tax, etc.). A2X simplifies this by ensuring accurate tax recording in QuickBooks, separating tax transactions from sales.
Tax recording options in QuickBooks
Depending on whether you use QuickBooks’ tax module, A2X provides two ways to record taxes:
- Exclude sales and tax transactions from the tax module
- Sales and tax data are recorded without triggering tax reporting.
- Taxes go to a current liability account like “Sales Tax Collected.”
- Best for:
- Sellers in countries where tax varies by state or province (US and Canada)
- Sellers not tax registered or not using QuickBooks’ tax module.
- Include sales and tax transactions in the tax module
- Tax amounts are part of gross sales, and QuickBooks automatically calculates the tax with a selected tax rate.
- Best for:
- Sellers in countries with a single national tax system (UK, NZ, AU, and EU member states).
- Sellers who are tax registered and using QuickBooks’ tax module.
Tax setup by region
⚠ Note: This content is intended to be general. A2X does not provide tax advice. Consult a tax professional for compliance guidance.
Australia
- Shopify can collect 10% GST on applicable sales (when set up correctly).
- A2X will extract the GST from Shopify sales.
- Recommended A2X setup:
- Include sales and taxes in the tax module.
- Map transactions:
- Taxable Income & Taxes (GST) Collected: “GST on Income”
- Non-Taxable Income: “GST Free Income”
- Expenses: “GST on Expenses”
- Current Assets/Current Liabilities: “BAS Excluded”
- QuickBooks will handle BAS returns accurately.
- Learn more about Australian GST mapping in A2X here.
Canada
- Tax rates vary by province (GST, HST, PST, QST).
- A2X separates and records the total tax collected based on Shopify tax settings.
- Recommended A2X setup:
- Exclude sales and taxes from the tax module.
- Map transactions:
- Income & Taxes Collected: “No Tax,” “Tax Exempt,” or “Out of Scope.”
- GST/HST/PST/QST recorded to a liability account in QuickBooks.
- For province-level tracking, Shopify Tax provides a Canada sales tax report with GST, HST, PST, and QST summarized by province. Tools like Avalara add filing support.
New Zealand
- Shopify can collect 15% GST on taxable sales (when set up correctly).
- A2X extracts GST from Shopify sales.
- Recommended A2X setup:
- Include sales and taxes in the tax module.
- Map transactions:
- Taxable Income & Taxes (GST) Collected: “GST on Income”
- Non taxable income: “GST Free Income”
- Expenses: “GST on Expenses”
- Current assets/current liabilities: “GST Excluded”
- QuickBooks will calculate GST for returns.
- Learn more about New Zealand GST mapping in A2X here.
United Kingdom
- VAT can be applied at standard or reduced rates based on products. Learn more about Shopify VAT here.
- A2X categorizes and records VAT amounts.
- Recommended A2X setup:
- Include sales and VAT in the tax module.
- Map transactions:
- Income & Taxes (VAT) collected: “20% VAT on Income,” “Zero-Rated VAT”
- Expenses: “Reverse Charge”
- A2X can then isolate any EU VAT into its own liability or liabilities (by zone) account depending on customer preference.
- QuickBooks will handle VAT returns.
United States
- Sales tax collection varies by state laws and economic nexus. Learn more about US sales tax for Shopify here.
- A2X identifies taxable sales and separately records the total taxes collected.
- Recommended A2X setup:
- Exclude sales and taxes from the tax module.
- Map transactions:
- All transaction lines: “No Tax” or “Tax Exempt”
- Sales tax recorded to a current liability account in QuickBooks.
- For tracking what you owe per state, start with Shopify Tax, which reports US sales tax at the state, jurisdiction, and transaction level. Tools like Avalara or TaxJar add multi-channel nexus tracking and filing
Rest of world
For sellers outside the listed regions, tax regulations vary widely. Shopify may require you to collect and remit sales tax, VAT, or GST, depending on local laws.
- A2X can still help by categorizing and recording sales tax transactions according to your country’s requirements.
- Recommended A2X setup:
- If your country has a single tax rate, consider including sales and taxes in the tax module.
- If your country has multiple tax rates or complex tax rules, consider excluding sales and taxes from the tax module and mapping taxes to a liability account.
- Consult a local tax professional to ensure compliance with specific tax reporting requirements.
⚠ Note: This content is intended to be general. A2X does not provide tax advice. Always check with a certified tax expert to understand your obligations.
Ready to integrate Shopify and QuickBooks with A2X? Start your free trial today!
Frequently Asked Questions
FAQs about integrating Shopify with QuickBooks Online
- Connect A2X to Shopify & QBO and choose the bank account Shopify deposits hit. 2. A2X pulls each payout and creates a single journal that breaks out sales, refunds, fees, taxes, and gift card movement. 3. Auto-post (or review then post) – the journal appears in the bank feed and QuickBooks suggests a Match, so one click reconciles the deposit to the books. (Manual route: create a Shopify Clearing bank account, add each payout as a deposit, and split out fees as expenses.)
Integrate Shopify and QuickBooks Online for accurate accounting
A2X auto-categorizes your Shopify sales, fees, taxes, and more into accurate summaries that make reconciliation in QuickBooks Online a breeze.
Try A2X today
ABOUT THE AUTHOR
Amy Crooymans
Amy Crooymans is the Product Marketing Manager at A2X. A member of the A2X team since 2020, Amy brings 10 years of marketing experience to the team and specializes in making complicated ecommerce accounting topics simple to understand. See for yourself in her A2X YouTube videos! Amy works closely …
Integrate Shopify and QuickBooks Online for accurate accounting
A2X auto-categorizes your Shopify sales, fees, taxes, and more into accurate summaries that make reconciliation in QuickBooks Online a breeze.
Try A2X today